

이제 인스턴스랑 ip설정까지 했으니까 간단하게 react만을 이용한 프로젝트를 올려보려고 한다.
git을 이용해서 프로젝트를 옮길 것이므로,
repo를 하나 만들고 clone받은 후, 해당 위치에서 react 프로젝트를 만들어주자
이 때 repo를 public으로 만들어 두면 이후에 인스턴스에서 로그인을 안해도 되서 편함
🧵 간단한 react 프로젝트 생성
vite를 이용해서 react 프로젝트를 만들어준다.
npm create vite@latest kittyreact, JavaScript선택
생성된 프로젝트에서 쓸데없는 건 지우고, App.jsx를 수정해주자
랜덤으로 고양이 사진을 가져오는 open api를 이용해서 버튼을 누르면 고양이 사진을 볼 수 있도록 만들었다.
자세한 코드는 github에
https://github.com/gimezi/KittyPJT
GitHub - gimezi/KittyPJT: EC2 실습용 간단한 React 프로젝트
EC2 실습용 간단한 React 프로젝트. Contribute to gimezi/KittyPJT development by creating an account on GitHub.
github.com
react 프로젝트를 만든 다음에
이후에 build를 할 때, build 폴더를 생성 후 실행시킬 수 있도록 vite.config.js 파일을 수정해준다.
import { defineConfig } from 'vite'
import react from '@vitejs/plugin-react'

// https://vitejs.dev/config/
export default defineConfig({
  plugins: [react()],
  build: {
    outDir: 'build'
  }
})
여기까지 한 다음에 npm run build를 한 후, build 폴더가 생기는지, 에러가 안생기는지 확인 후 git push를 해준다.
🧶 인스턴스 새로 만들고 연결하기
인스턴스에 보안 그룹 설정에서 inbound rules를
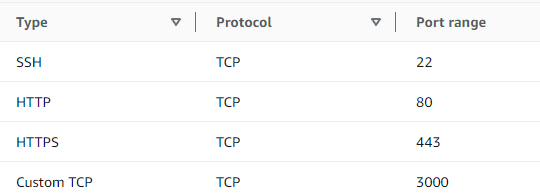
이런식으로 만들고, 인스턴스를 생성해준다. Elastic IP도 같이 붙여주자
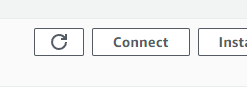
만들어 둔 인스턴스로 가서 기본설정 그대로 Connect를 해준다
✨ 인스턴스에서 서버 켜기
1. node 설치하기
curl -sL https://deb.nodesource.com/setup_14.x | sudo bash -
sudo apt install nodejs
sudo apt-get update
sudo apt-get install nodejs
설치 후 버전확인을 해서 잘 깔렸나 보자
node -v
npm -v
2. 아까 만들어둔 프로젝트를 클론해오기
git clone 레포주소
3. 플젝 위치로 가서 install
cd 플젝폴더이름 (정확하지 않으면 ls로 확인해보자)
npm install
npm install express --save
4. build
npm run build
5. server.js 만들어주기
vi server.jsimport express from 'express';
import path from 'path';
import { fileURLToPath } from 'url';
import { dirname } from 'path';
const __filename = fileURLToPath(import.meta.url);
const __dirname = dirname(__filename);
const app = express();
// 여기에 아까 생성한 포트번호 넣어주기
const port = 3000;
app.get('/ping', (req, res) => {
res.send('pong');
});
app.use(express.static(path.join(__dirname, 'build')));
app.get('/*', (req, res) => {
res.set({
'Cache-Control': 'no-cache, no-store, must-revalidate',
Pragma: 'no-cache',
'Date': new Date().toUTCString(),
});
res.sendFile(path.join(__dirname, 'build', 'index.html'));
});
app.listen(port, () => {
console.log(`app listening at http://localhost:${port}`);
});이코드는 나중에 공부하자..
이거 그대로 복붙하고, ecs누른 후, :wq누르면 저장하고 나와짐
6. 서버 실행하기
node server.js
서버가 실행된 상태로 ip주소:3000을 입력하면
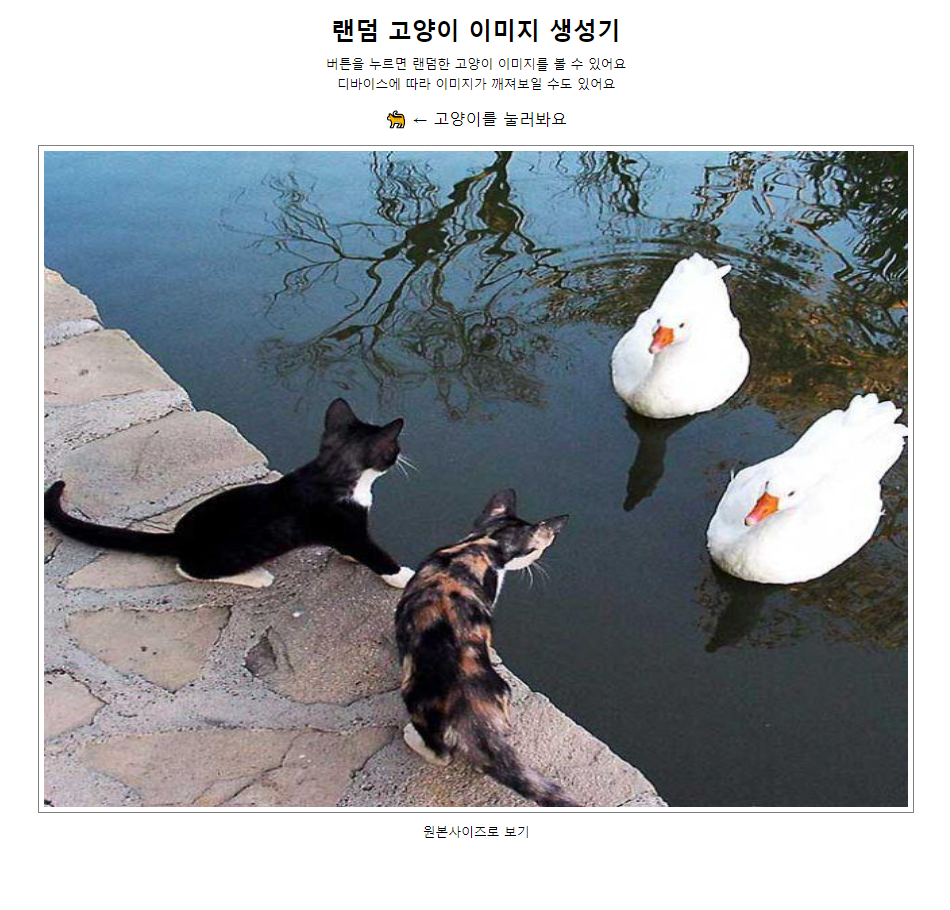
아까 만들어 둔 react 프로젝트를 볼 수 있다!
이제 포폴 사이트 만들던거 마저 완성시키고 띄워봐야겠다...
'Server' 카테고리의 다른 글
| [Server] MAC환경에서 UTM을 사용해서 Ubuntu사용해보기 (0) | 2024.07.19 |
|---|---|
| [Server] 리눅스 기초: 기본적인 명령어들과 그 역할 (0) | 2024.07.05 |
| [Server] Elastic IP 만들고 붙이기 (0) | 2024.07.04 |
| [Server] EC2에서 인스턴스 만들기 (1) | 2024.07.04 |
| [Server] 배포와 EC2가 대체 뭔가요 (0) | 2024.07.03 |